Welcome to our annual newsletter, intended for existing business partners, who have an active registered account. The newsletter below highlights changes to the profiling back-office system, profile credit pricing and profile reports.
We have been busy in 2022/2023 with updates and maintenance to ensure that our system is available and secure for our business partners.
Reminder: We are here to help you! If you run into difficulties with the back-office or you need help enabling/disabling existing options drop us a message at support@colorpersona.com.
The key areas covered are:
- Part 2 of profile pricing update & credit cost per profile.
- Customisation service of new Profile Templates.
- Repeat Single use questionnaire for multiple recipients.
- Preview Profile Reports.
- Download Sample PDF Report from your account.
- General Styling Updates.
- Profiling Styling Configuration
- Back-office Configuration Options
- Rename colour labels.
- Add custom footer text.
- Selecting a Different Profile Template Report.
- Re-publish a Different Profile Template Report.
- How to search on list pages
- How to export the list to PDF
- Back-office maintenance updates.
- Look and feel.
- Web security.
- PayPal interface update.
- Software & bug fixes.
- Updated Charting software engine.
- Updated RAD development tools used for the system development.
- Updated PDF software & Publishing engine to bring them up to date.
- Reminder: PDF report file purge after 90 days
Profile Pricing Update.
As part 2 of the profile credit price increase continued from 2022, we will be increasing the price of a profile credit by $1 USD. The increase will be effective as of 1st April 2023. Please note that the usual volume discounts apply.
For business partners who top-up credits to their account prior price increase, you can take advantage of the current prices and discounts up to and including 31st March 2023, before the increase on 1st April.
The credit deducted for the Team colour profile * report has been reinstated to 1 credit as the price for this profile has been kept below market value for as long as possible.
The credits are deducted per profile as follows, see below for your reference.
| Profile Type | Cost in Profile Credits |
|---|---|
| Executive Default(Standard) | 1 |
| Personal Development | 1 |
| Equality, Diversity & Inclusion | 1 |
| Simplified and Clean | 1 |
| Human Resources Default | 1 |
| Simplified and Clean | 1 |
| Career Review Default | 1 |
| Simplified and Clean | 1 |
| Positive Profile | 1 |
| Recruiter Default | 1 |
| Simplified and Clean | 1 |
| Positive Profile | 1 |
| Young Adult Default | 1 |
| Simplified and Clean | 1 |
| Youth Personal Development | 1 |
| Colour Team Profile * |
1.0 |
| 360 Candidate Feedback | 1.5 |
| Team Insight Feedback | 1.5 |
You can get more details and preview each of the profiles we offer – see the link below.
<< Profile report options >>
Customisation service of new Profile Templates.
We have been offering customisation to existing standard profile reports to some business partners, and have opened up this offer to other business partners, but you will require an Advanced/Premium account to take up this offer.
We can take an existing standard profile template and craft a new one in its place, based on your requirement format.
If you believe that you can better market your services using a more customised profile report attuned to your style of training and business, then get in touch and we can discuss your requirements.
Repeat Single use questionnaire for multiple recipients.
To help business partners to save time creating volumes of single-use questionnaire links, we have extended the creation of questionnaire links by adding a feature to duplicate an existing ‘single-use’ questionnaire link.
See the FAQ page and how-to video on how to achieve this.
Preview Profile Reports.
As a reminder, you can view different sample Profile reports, simply click on the ‘Preview PDF Profiles’ button to preview the profiles. The button will open up a new browser tab.
Download Sample PDF Report from your account.
You can also Download a sample PDF report from the Resources page in your Color Persona Business Partner account – click on the button below (** You will be required to login first!), then from the list of profiles, click on the PDF icon (![]() ) for the report you want to download.
) for the report you want to download.
The previews & sample PDF reports illustrate the look and feel of the latest versions of the reports. If you have any queries, please contact us at support@colorpersona.com.
General Styling Updates
Back-office styling changes.
- Update to back-office look and feel style sheets.
- Redesign the landing page with simplified button options to take up less space.
- New user-centric help messages on a number of pages to aid system usage
Profile Styling configuration.
This a reminder to some of the options for your advanced account (if you have not already implemented them).
Rename colour labels for the Profile reports
This option enables you to rename the default Blue, Green, Red and Yellow labels in the reports including charts. e.g. Detail, People, Action and Social. This option is available to Advanced account holders. If defined, it will apply the new labels to all Personality profiles, 360 feedback and Team colour profiles.
To rename the labels in your report:
- From the landing page after login, scroll down to the ‘Profile Configuration’ section.
- Select the ‘Advanced Profile settings’ link.
- You will see a list of existing settings for your account, click on the Add new button.
- From the Setting Type field drop-down, select the ‘Change Colour Labels Text from ‘Blue,Green,Red,Yellow …’
- In the Setting Value box, type in the new Label for each colour, separated by a comma and no spaces. e.g. ‘Detail,People,Acton,Social’. Keep the labels to one word and try to avoid long words as there may be text overflow on the charts.
- Click the Save button.
The Labels will override the colour labels on all Personality profile reports and charts.
Add custom ‘Left’ Footer text on PDF reports
This option enables you to override the Footer on the bottom left-hand side of profile reports on each page, this will enable you to add your company name and email address and/or telephone number. This option is available to Advanced account holders. If defined, it will apply the new footer text to all Personality profiles, 360 feedback and Team colour profiles.
To add Text on Left Footer on PDF reports:
- From the landing page after login, scroll down to the ‘Profile Configuration’
- Select the ‘Advanced Profile settings’ link
- You will see a list of your existing settings, click on the Add new button.
- From the Setting Type field drop-down, select the ‘Text to use in PDF profile report footer, bottom left. Max length 40 chars. Text only.‘
- In the Setting Value box, type in your Footer text to be placed at the bottom left corner of each profile report. e.g. Color Persona support@colorpersona.com
- Click the Save button.
The footer will override and place the entered footer at the bottom left corner of the PDF report. Ensure this is not too long as it will cause the report to throw blank pages.
Selecting a Different Profile Template Report.
We are pleased to announce that business partners can now Re-publish a profile report using a different profile template for the same profile type after the report has been published. This means the following:
- Additional credit is NOT deducted.
- Only one version of the report is retained in the system, so ensure you have Auto Send Me set to Yes (follow link to check/Edit), to get a copy of the report emailed to you. You may also need to keep all copies of the PDF reports locally to avoid the loss of previous PDF reports.
- A profile report can only be re-published 3 times without deducting any credits, and thereafter you will be unable to re-publish the report.
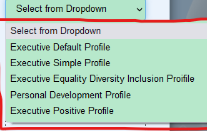
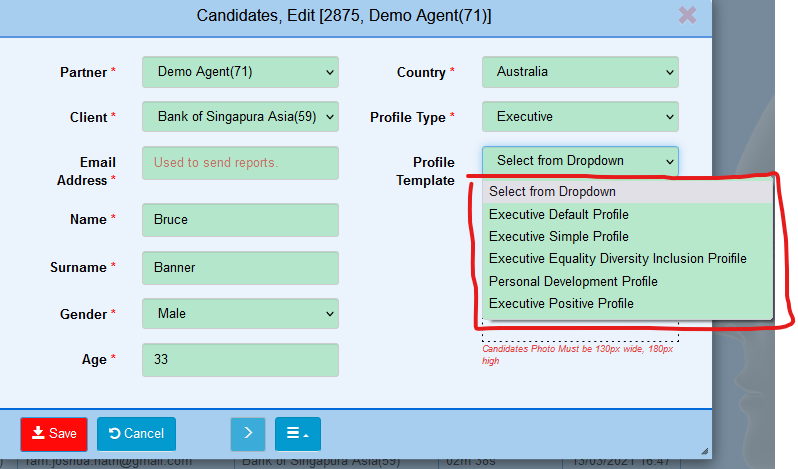
You can now change the profile template to the one available for the profile type for the candidate. As an example, we have used the Executive profile type, see the sample below:

Let us get started and select a different profile template!
- Navigate to the Candidates page.
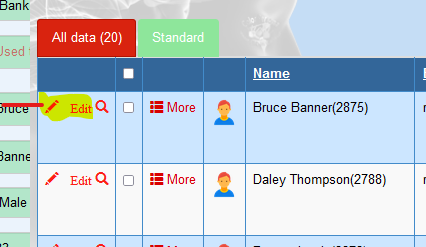
- From the candidate’s list page, click on the Edit icon for the correlating candidate.

- From the Pop-up edit page, click on the drop-down and select a Profile Template (Not the current one that is already set), for this example we will select Personal Development Profile template.

- Click on the ‘Save‘ button.
Re-publish a Different Profile Template Report.
- After saving the changes as above, click on the ‘More icon’ to expand Publish Profile Tab for this candidate.

- Click on the Re-publish button.
- Wait for the report to be published and emailed to your email account.
* Note: If the Publish count has reached a maximum of 3, you will not be able to do this.
How to search on list pages.
The back office is equipped with comprehensive filtering and searching facilities, here we will briefly illustrate how to search on list pages:
- After login, navigate to the Candidate or Send Questionnaire page, for example, we will use the Candidates List page
- Once there, you can filter on the left-hand side using and selecting the required client, profile type and profile template.
- To search for a candidate:
- In the simple search input box (top right near magnifying glass icon), enter the name or partial name or ‘candidate Id’ if you know it and click on the Search icon next to the input box.
- This will list any results found
- To use the advanced search:
- Click the drop-down ‘More‘ option on the right of the search input box
- From the list of search criteria, select the required conditions and values, then click on the Search button
- This will list any results found
How to Export to a PDF file on list pages.
The back office is equipped with facilities to export a list to file (whole or partial selection or results from a search); here we will briefly illustrate how to export the results from list pages:
- After login, navigate to the Candidate or Send Questionnaire page, for example, we will use the Candidates List page
- Once there, you can filter on the left-hand side using and selecting the required client, profile type and profile template.
- To Export the results to a PDF file:
- You can select the rows you want to export or all rows on the page or all rows across all the tabs
- Click the ‘Printer icon‘ button, above the list (on the right)
- Then select the printing scope e.g. Print all pages, this page, and then select the number of rows per page or leave it to default option.
- Then click on the ‘Print‘ button
- Then, A preview of the output will be displayed
- Click on the PDF view button and wait for a while
- A dialogue will be displayed to open or save the PDF file. You may encounter a different behaviour, depending on the browser and operating system being used.
Back office maintenance updates.
2022 Highlights of back-office Updates.
Below are the headline changes to the back office, although most of the changes are not invisible to the end user.
- The Rapid Application software has been updated to the latest version
- Website security patches have been applied to ensure your data is secure.
- Chart generation software has been changed to another provider and the Publishing engines have been updated to use the new charting software. You will notice some differences in the aesthetics between the new and the old charts, for example, the colours are lighter and crisper.
- Updated Mailing software to the latest version.
- PayPal interface changed behind the scenes for security and compatibility with the latest APIs.
A reminder of Client level Publishing control
A new option was added in the advanced account, which allows you to override the publishing settings at the client level. The settings include Auto Publish, Auto Sent to Business partner, and Auto send to Candidate, you can also specify different values to use for the Client Trade name, Client Tag line and client Email footer. If any of these values are specified at the client level, they will override the default Company level publishing settings. This means that profile publishing can be different from the default company settings and also other client settings too.
Reminder: PDF report file purge after 90 days.
Business partners are reminded that the published PDF profile reports will be deleted from the system, 90 days after the published date.
You can republish the report (if the publish count is less than 3) to generate a new version of the report if required.


